Chapter 1: Start-HSB
Welcome to NGU Idle, an incremental idle game by 4G.
- Incremental games start out small with a few basic features, but expand as you progress to unlock new features.
- Idle games revolve around time as their core mechanic, typically starting out with very quick wait times that become longer as you progress, requiring some level of optimization to reduce wait times.
Starting out
Before we mess around with features, here are a few useful settings to set at the start:
- Navigate to the Settings by clicking the gear icon in the bottom left
- Sync Training - ON (syncs resource allocation between Attack/Defense skills in BT)
- Anti Fast Bar Flicker - ON (reduces flashing/flickering on speed bars at high speeds)
- Autoboost Recycled Boosts - ON (autoboost consumes all boost recycles)
- Some optional settings you can also set based on preference:
- EXP Purchase Confirmation Popups - if ON, displays a confirmation modal for every EXP purchase. Turn OFF if these confirmation modals annoy you
- ITOPOD Perk Confirmation Box - same as above, but for ITOPOD Perk purchases
- Simple Inventory Shortcuts (page 2) - if ON, simplifies inventory shortcuts for Autoboost / Automerge by removing the need to click to use the shortcut
Energy: Your First Resource
One of the core mechanics of NGU Idle is resource management. Over time, you gain resources that can be allocated across various features, and how you choose to allocate those resources is one of the main choices in how you progress through the game.
- Energy starts at 0 and starts accumulating from the moment you start the game
- The green bar at the top left that says Energy will start filling up. Every time the bar fills up, you get 1 point of idle energy that you can allocate to features
- The Energy bar displays your energy as Idle Energy/Cap
- Idle Energy refers to energy that is available to be allocated
- Cap refers to your total energy accumulated, including energy that has been allocated to other features. When your cap reaches your maximum energy cap, you will not be able to gain any more energy until you raise your total cap
- Energy can be improved by buying Energy stats with EXP in the ‘Spend EXP’ menu
- Energy Speed improves the speed that the Energy bar fills up
- Energy Power improves the effectiveness of each point of Energy
- Energy Cap improves the total amount of energy that can be obtained
- Energy Bars increases the amount of energy gained every time the bar fills
Starting Mechanics
Basic Training (BT)
- Basic Training uses Energy to boost Attack/Defense (A/D) stats in Fight Boss
- Start training by adding some Idle Energy to Idle Attack by clicking the + to the right
- If Sync Training is on, the same amount of energy will also be allocated to Block
- Every level of Idle Attack/Block provides 150 Attack/Defense, respectively
- Getting 5k levels of Idle Attack/Block will unlock Regular Attack/Defensive Buff
- As you unlock new tiers of Basic Training skills, move your Energy down to better skills
Fight Boss
- Fight Boss uses the Attack/Defense you’ve been getting from Basic Training to fight bosses
- From Boss 6 onwards, defeating a boss grants 1 EXP, with an extra 3 EXP for first time
- Defeating Boss 4 unlocks Adventure Mode, where you can fight enemies for gear / loot
- Fight Boss continues to unlock features at bosses: 17, 30, 37, 58
- After Boss 58, all future features will be unlocked in Adventure Mode
Adventure Mode / Inventory
- Unlocked after boss 4, Adventure Mode allows you to fight enemies for gear and loot
- Also unlocked is the Inventory, where you can manage adventure drops and equip gear
- Turning on ‘Idle Attack’ will automatically attack, or you can manually fight with BT skills
- Farming and wearing better gear is the main source of progression
- Adventure bosses (marked with a yellow crown) have a chance of dropping gear
- Gear can be merged in Inventory (drag/drop multiples together) and worn for its stats
- Power/Toughness improve your Adventure stats to kill enemies faster
- Equipment Power/Toughness also provide an Attack/Defense multiplier
- Leveling items to 100 maxes that item; maxing all items in a set grants special bonuses
- Farm an adventure zone until you max all the items in the set, then move on
- The Item List in the Inventory can be helpful to view items, sets, and set bonuses
- Enemies can also drop boosts, which can be applied to gear to improve the gear
- Leveling a boost to 100 provides a permanent +2% increase to all boosts
- Boost gear until max (green) > Merge boost to max > Dump in Infinity Cube
EXP Spending
- As you get EXP from killing bosses, you should spend this EXP on Energy stats
- Total ESpeed 25 → Base EBars 4 → Total ESpeed 50 → Base ECap 300k
- After the above, continue buying Energy in a base Power:Cap:Bar ratio of 1:37.5k:1
- For every 1 Energy Power bought, buy 37.5k Energy Cap and 1 Energy Bar
- When you stop using Energy Speed gear, bring Base Energy Speed to 50
- Other EXP purchases:
- Magic: Not worth spending EXP on in this chapter, doesn’t help with progression
- Adv Stats: Not worth buying in Normal. Temporary stat boost vs permanent energy
- Other: Buy one-time purchases when their cost is about 10% of your total EXP
- Check lifetime EXP in Info n Stats > Misc Stats > Total Earned EXP
- Suggested early purchases: Basic Loot Filter, Boost Recycling, Inventory Slots
AP Purchases
Arbitrary Points (AP) are the game’s premium currency. You gain some AP slowly over time, but you can also purchase AP with real-world money to speed up AP purchases. Your AP income in-game will also increase as you progress through the game, so focus on progressing further.
- You can get 50k AP one time for free by going to Info n Stuff > SPECIAL PRIZE
- The two most important AP purchases are Improved Loot Filter (ILF) and Yellow Heart (YH)
- ILF provides the best QoL improvement in the game, being able to filter individual items
- Once the YH is maxed, it provides a global +20% bonus to all AP sources without needing to wear the heart, making it easier to buy all other AP purchases
- Free to Play (F2P) players typically will not be able to afford either yet, just keep saving up
- For whales (paid players), you’ll probably want to use most of your AP on accessory slots
- Other potentially useful AP purchases around this time:
- Filter Boosts into Infinity Cube - dumps all filtered boosts into the infinity cube instead of trashing them. Boosts filtered this way will not be recycled.
- Insta Training Cap - once BT caps are all down to 1, buying this with the EXP Training Auto-Advance will fully automate Basic Training
Rebirths
After a while, you should find your progress slowing down significantly. Your Energy can’t keep up with costs and your Attack/Defense gains have slowed to a crawl against bosses. Then, it’s advised to do a rebirth, which soft-resets your run in exchange for Number, an A/D multiplier. Rebirthing allows you to progress further and faster, and get more EXP from farming bosses.
-
Things that are reset/lost on rebirth
- Generated/Allocated Resources: all resources start again at 0 and start filling again
- Basic Training levels
- Boss Progress: reset back to Boss 1
- Access to any tab locked behind a certain Boss (Adventure, Augs, TM, BM, AT)
- Any levels in these tabs (Aug levels, TM levels, AT levels, blood, wandoos levels)
-
Things that are kept/persist through rebirths
- EXP/AP/PP (amount of EXP/AP/PP is kept, anything purchased is also permanent)
- Inventory items / equipment
- Wandoos OS levels
- Access to tabs: Basic Training, Money Pit, Inventory, Wandoos
- Challenge Rewards
-
Benefits of Rebirthing
- Raising your Number provides an Attack/Defense multiplier to kill more bosses
- Resetting bosses means you can earn boss EXP again by killing the same bosses
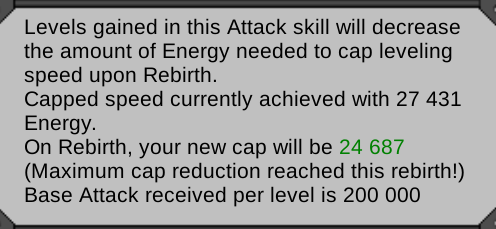
- Basic Training skills cost up to 10% less energy per rebirth, based on levels obtained
- At the start, you get free Energy Cap up to 100k, based on energy generated
- Money Pit cooldown resets to 1 hour
-
Number Calculations: Your Number after rebirthing is dependent on a few factors:
- Highest boss defeated in this rebirth and the previous rebirth
- The total length of this rebirth and the previous rebirth
- This rebirth’s Training Level Factor (+1 for every 10k levels in Attack Basic Trainings)
- This rebirth’s Blood Number Boost bonus from Blood Magic
Early on, it’s suggested to do 30 minute rebirths (30m RBs) as often as possible
- Your main two priorities should be farming EXP from bosses and reducing BT caps
- Rebirthing resets boss EXP, it’s faster to get 20 EXP from killing the first 24 bosses every 30 minutes than spending hours pushing for one more boss for just 1 EXP
- Rebirthing reduces the cost of BT skills by up to 10% based on levels obtained
- With enough rebirths leveling up BT skills, you can get each skill to run at max speed with 1 energy each, freeing up your energy to be used for other uses
- Within 30 minutes, focus each BT skill until hovering over the skill shows that you’ve reached maximum cap reduction
Unlockable Mechanics
Money Pit / Daily Spin
- Unlocked after 100k gold, you can throw all your gold into the Money Pit for a random reward.
- At least 100k gold must be thrown into the pit for a chance for a reward
- The cooldown between Money Pit uses starts at 1 hour, then increases by 1 hour after each use in the same rebirth. Rebirthing resets the cooldown to 1 hour since last use.
- Also inside the Money Pit menu, the Daily Spin gives a free daily random prize
- The Daily Spin has tiers of rewards, which increases as you use the Daily Spin more
Augmentations (Augs/Augments)
- Unlocked after Boss 17, Augmentations cost gold and energy for an A/D multiplier
- There are 7 augmentations, each with an upgrade that improves the base multiplier
- Each augmentation and its upgrade has to be unlocked by defeating a certain boss
- Different augmentations stack additively: It’s better to focus one augment than multiple
- Augmentation levels cost increase linearly with level, and levels are reset on rebirth
- Focus the most expensive augmentation you can still afford/finish within 30m
- Upgrades cost too much gold to be worth focusing just yet
Advanced Training (AT)
- Unlocked after all Basic Training skills have been unlocked
- At max speed for all BT skills, it takes 25 minutes to unlock Advanced Training
- Advanced Training costs energy for a boost to your Adventure Mode capabilities
- Adventure Toughness/Power+ provides a boost to your Toughness and Power stats
- Block Damage improves the effectiveness of the Block skill in Adventure Mode
- Advanced Training levels cost increase linearly with level, and levels are reset on rebirth
- AT can be useful for increasing your adv stats to be able to fight in a new zone or kill faster
Time Machine (TM)
- Unlocked after Boss 30, Time Machine grants a continuous and automatic source of gold
- Time Machine’s gold production is based on the single highest gold drop in the current run
- Improve gold production by wearing Gold Drops in the furthest adv zone you can kill
- After getting a kill with Gold Drops, it’s not necessary to keep Gold Drops gear on
- Time Machine can also be leveled in two stats: Machine Speed and Gold Multiplier
- These stats cost energy and magic, respectively. Levels are reset on rebirth.
- This early, it’s too difficult to get meaningful levels in TM, so it’s not advised to level
Blood Magic
- Unlocked after Boss 37, Blood Magic permanently unlocks a new resource: Magic
- Blood Magic has two parts: Blood Rituals and Magic Spells
- Blood Rituals cost gold and magic to produce blood
- Magic Spells use blood to produce various effects
- Accrued blood and spell effects are reset on rebirth
- In this chapter, you’ll mostly be looking to use Poke Yourself with a Tack / Blood Number Boost
ITOPOD (Infinite Tower of Pissed Off Dudes)
- Unlocked after consuming the ‘Pissed Off Key’ from The Sky, the ITOPOD is a special adventure zone, consisting of floors of enemies to defeat so you can climb up the tower
- Each floor requires you to defeat 10 enemies to progress to the next floor
- Each floor has enemies that are 5% stronger than the previous floor
- Each enemy defeated grants a tiny amount of Perk Point Progress (ppp)
- The base amount dropped from an enemy is (200 + floor) ppp per kill
- Gathering 1 million ppp will grant you 1 Perk Point (PP)
- Each 10 floors, the first time you conquer that floor, you get a one-time PP reward
- Floor 10, 20, 30, …, 90 each grant 1 PP, then Floor 100 grants 10 PP
- Perk Points can be used on ITOPOD Perks, permanent bonuses that cost PP to buy
- In this chapter, you should look to climb the tower as high as you can for the first time bonuses
- It’s not worth it to farm the ITOPOD for ppp this early, as you don’t have enough stats or bonuses to get any significant ppp. Just climb (set start floor to 0, end floor to 100).
- Spend the PP you get on the first 5 Newbie perks (Perks 0-4), then get 2 levels of Instant Advanced Training Levels (Perk 18), and then alternate any remaining PP between Generic Energy Power I (Perk 6) and Generic Energy Cap I (Perk 8)
Wandoos
- Unlocked after consuming ‘A busted copy of Wandoos 98’, Wandoos uses Energy/Magic to provide an Attack/Defense multiplier. Wandoos is permanently unlocked once unlocked
- Wandoos takes an hour to boot up to max speed, increasing speed from 0% to 100%
- Wandoos levels are reset on rebirth
- In this chapter, Wandoos is too expensive to provide much benefit, just ignore it for now.
Adventure Zones
Tutorial Zone
- The first adventure zone, unlocked automatically when Adventure Mode is unlocked
- Adventure bosses have a chance of dropping gear, merge + equip the gear in Inventory
- Items will drop at Level 10, so you only need 10 of each item to max it
- Stay in Tutorial Zone until you have maxed all 5 items in the Training Set
Sewers
- Unlocked by defeating Boss 7
- Sewers set includes 4 gear, 1 weapon, and 2 accessories, each dropping at Level 4
- Sewers also has an extra drop, the Tutorial Cube. This is not a part of the Sewers set
- Stay in Sewers until you’ve maxed the Sewers set and the Tutorial Cube
Forest
- Unlocked by defeating Boss 17
- Forest set includes 4 gear, 1 weapon, and 2 accessories, each dropping at Level 1
- One of the accessories, the Forest Pendant, drops with no stats. You should still collect and merge Forest Pendants together.
- Forest Pendants will also drop in the next 3 zones
- Forest also has an extra accessory, the Tuba of Time, which is not a part of Forest set
- From now on, every adventure zone will contain an extra accessory that is a part of the Normal Bonus Accessories set. This set starts at slot 432 in Item List
- Stay in Forest until you’ve maxed everything but the Forest Pendant
Cave of Many Things
- Unlocked by defeating Boss 37
- Cave set includes 4 gear, 1 weapon, and 3 accessories
- Cave also drops the Cheese Grater from Normal Bonus Accs, and Forest Pendant
- Stay in Cave until you’ve maxed the Cave set
The Sky
- Unlocked by defeating Boss 48
- The Sky does not have a set or gear drops, but instead has a few rare drops
- There is a Normal Bonus Accessory: A Dragon’s Left Ball
- Rare drops: Pissed Off Key, A busted copy of Wandoos 98, Looty McLootFace
- The Pissed Off Key is a guaranteed drop on the first Sky boss killed. Make sure you are not filtering Misc items and you have available space
- Once you have enough stats to kill enemies quickly, The Sky is the best adventure zone to farm boosts early
High Security Base (HSB)
- Unlocked by defeating Boss 58
- HSB set includes 4 gear, 1 weapon, and 2 accessories
- Normal Bonus Accessory: Magicite Crystal
- When you start farming HSB gear, extend your rebirths to be 1 hour long
- This will allow you to farm HSB for longer each rebirth and allow you to fight T1
- You should max HSB, but you should be able to fight T1 with 10-20 levels of HSB gear
Titan 1: Gordon Ramsay Bolton
- Unlocked by defeating Boss 58
- Titans are Adventure mega-bosses that have their own adventure zone and spawn time
- After killing Boss 58, Fight Boss no longer unlocks any new features, instead unlocking new adventure zones to farm. All features are now unlocked by defeating Titans
- Titan 1 (T1): Gordon Ramsay Bolton spawns an hour after rebirthing or after being killed
- It’s recommended to fight Titans manually using skills instead of Idle Attack
- Suggested stats: Manual (1350/1350 Power/Toughness), Idle (2300/2100 P/T)
- T1 has a random chance to inflict a bleed, which deals constant damage over time
- These bleeds can stack, eventually negating your HP Regen
- As a result, T1 fight can be somewhat RNG-dependent, you may get unlucky with a lot of bleeds and just not be able to survive long enough to kill T1
- Once you’ve defeated Titan 1, you’ve graduated from Chapter 1! You can move to Chapter 2
FAQ
-
Should I still rebirth at 30 minutes if my Number is going to go down?
- Yes. While it’s nice to defeat as many bosses as you can, defeating more bosses by resetting often will grant you more EXP.
- Taking 30 minutes to kill 2 extra bosses grants 2 EXP. Doing a 30 minute rebirth to kill the first 30 bosses grants 26 EXP. Rebirthing often to reset boss kills will grant more EXP than doing long rebirths to push bosses.
- Losing Number is not a significant loss, as Number will climb naturally as you buy more energy, which will improve all your features to make you stronger in Boss Fight.
- It’s typical to have your Number be inflated on any run that’s longer than normal due to the time factor (e.g. rebirths after an overnight run or long hiatus)
- After Boss 20, every boss has 10x the stats of the previous boss. This means it takes 10x Number loss to fall back 1 boss. So losing 500x Number is still only around 2-3 bosses, which you can overtake with better energy
- Yes. While it’s nice to defeat as many bosses as you can, defeating more bosses by resetting often will grant you more EXP.
-
I’ve hit a wall, I can’t kill the next boss. How do I progress?
- Generally, progress through this game is bottlenecked by Adventure zones and farming gear, not from fighting bosses. Farm your adventure zones and max out sets of gear. For every point of Power/Toughness from your gear, you also get +1% Attack/Defense.
-
What gear should I be wearing?
- Focus mostly on Power (kill enemies faster) and Energy Power (stronger augments)
-
Should I do challenges?
- No, the suggested time to start challenges is towards the end of next chapter, after defeating Boss 100. If you’re very eager to start challenges, the first good point would be after defeating Titan 1 a few times to get a set of T1 gear.
- It’s recommended to wait to do challenges until you have progressed further in Adventure. While completing the Basic Challenge is possible after Boss 58, it might take a day or longer to complete. If you wait until you have better gear and stronger energy, you will be able to complete basic challenges in a few hours.
- If you’re aiming to complete basic challenges around T1, expect each basic challenge to take up to 8 hours of active 15m-1h rebirths
- No, the suggested time to start challenges is towards the end of next chapter, after defeating Boss 100. If you’re very eager to start challenges, the first good point would be after defeating Titan 1 a few times to get a set of T1 gear.
-
Should I use Iron Pill?
- Iron Pill grants a very small amount of adventure stats for the blood investment, taking the fourth root of the amount of blood. Spending 100 blood grants 3 power/toughness, spending 1000 blood grants 5. Generally, it isn’t worth it early, when getting 100 blood is a heavy investment. Once you can obtain it more easily, you can use it on cooldown.
-
How do I get more AP?
- By spending real-world money, or just slowly by playing the game. Your AP income will increase as you progress further in Adventure, as you’ll gain access to more sources
-
What items should I keep?
- All the items from this chapter can be replaced. Starting from the next chapter, some items will provide unique specials that are rare to find on items, but most of the gear found in this chapter are relatively common stats.