Chapter 8: Sadistic
Welcome to Sad. It’s time for guffs to finally get good.
Note: If you’re playing on Kong, you’ll need to switch to Steam/Kartridge for Cooking/THE END
CBlock
Your first priority is the entry CBlock: All Basic, NoAugs, 100LC, NoEquip, NoRB, and 2 Trolls
TC2 changes guff scaling to give peak efficiency up to 24h of a RB (from 30m). This drastically improves guff gains, especially when paired with muffs, which doubles guff bonuses for next 24h
Post-CBlock
- Resume 24 hour rebirths, but now you’re looking to use muffs every other day
- Aim to get 2 usages of the muff with rebirths that are slightly shorter than 24 hours
- The Beast’s Fertilizer and Five O’Clock Shadow reduces the timer for fruits/beards
- With max fertilizer, all your T24 fruits will finish growing at 22:48 into your rebirth
- Before a rebirth, use a Muff, RB (1 proc), follow your normal RB for 23h, then RB (2nd proc)
- This gives a limited time to get the 2nd proc, before 24 hours pass after muff activation
- Daily AP income is around 26-28k AP/day, this affords you a muff every 2 days sustainably
The meta path alternates between 23-24h muff rbs and LRB’s:
- 23h muff rbs from entry cblock to West World snipe
- LRB from WW snipe to T10v1
- Muff rbs from T10v1 to T10v2
- LRB from T10v2 to T11v1
- Final CBlock post-T11, finish TC’s, Blinds, anything with rewards (skip NoTM/NoNGU)
- Muff rbs from T11v1 to T11v2
- LRB from T11v2 to T12v1
- Muff rbs from T12v1 to T12v2
- Suggested to have at least 4.5k% adv guff for last LRB
- LRB from T12v2 to THE END
EXP Spending
Spend EXP on Adventure Power in LRBs, E/M/R3 outside of LRBs
Hackdays/Snugdays
Instead of set breakpoints for HDs, do a HD whenever you can get 1.3x adv gain After a HD, do a Snugday (sNGU), using E/M beta/deltas with NGU gear to push sNGUs Before first HD, it may be beneficial to run sNGUs for a few hours with NGU gear and E/M alphas to get some quick/cheap sNGU bonuses before diminishing returns kick in
Perks
- Welcome to Sadistic difficulty (Perk 144, 500k PP)
- QP Tier (Perk 167, 800k PP)
- Card Recycling: Card Spawn (Perk 216, 3M PP)
- Adv Tier (Perk 172, 3M PP)
Quirks
- Improved Base ITOPOD PPP (Quirk 70, 40k QP)
- BIG CHONKER CARDS (Quirk 149, ~39k QP)
- Card Recycling: Mayo (Quirk 156, 40k QP)
- Wish Tier II (Quirk 114, 9k QP)
- PP Tier (Quirk 110, 20k QP)
- Adv Tier (Quirk 119, 39k QP)
- Beasted Boosts IV (Quirk 73, 90k QP)
Card Tiers/Tags
It’s expected that you’ve been running hack/adv/wish tags up until now. It’s time to branch out.
After obtaining the Card Recycling perks/quirks, start pushing for PP/QP/NGU Tiers:
- Start tagging/casting PP/QP cards at Tier 4
- Start tagging/casting NGU cards at Tier 8 (typically post-T10)
- Tag priority typically shifts from Hack/Adv/Wish → Adv/Wish/PP/QP → Adv/PP/QP/NGU
- As you reach card limits below, keep Adv/PP/QP, rotate your last tag as desired
- Start yeeting meh cards if mayo is a concern
- If you have extra AP, use infusers like muffs. Infusers affect mayo fruit rewards
Card Limits
You can stop casting these card types after they reach these % bonus values:
- Hack/Wish: 500%
- Drop Chance: 1000%
- NGU’s: 2500% (each)
- A/D: 100m%
Chonkers
Buying the BIG CHONKER CARDS Quirk unlocks Chonker drops, cards with guaranteed max rarity (1.2x) costing between 21-29 mayo. Chonkers have a separate timer than regular cards.
- Cast any Chonkers that match the tags/bonuses that you would normally cast for cards
- If you don’t have Card Recycling: Card Spawn perk, keep any Chonkers you don’t want until you’ve bought it, which advances the Chonker timer by 25% per yeeted Chonker
E/M Hardcaps
- E/M Cap is hardcapped at 9e18 (9Q), stop buying at 3.5e12 (3.5T) cap
- 3.5T cap gets to hardcap with duct tape, all cap wishes, perks 1-4, quirks 1-2, 2500 guff
- You can stop buying E/M Bars whenever you reach a desired cap time for E/M
- E/M Power is hardcapped at 1e18 (1Q) pre-pots, stop buying at 4e8 (400M) pow
- For R3, you can stop buying R3 around 50k-60k power (cap in ratio)
- R3 hardcaps are the same as E/M, but 50k-60k R3 is enough to finish all hacks/wishes
Items to Keep
Note: This is NOT an exhaustive list of good items or the only items to keep. These are just items obtainable in Sadistic that are worth acknowledging. Most E/M/R3/Wish items are not included in this list, use GO to keep track of items that fit in your loadouts. Generally, any item with a unique special bonus (AT / wandoos / respawn / cooldown / NGUs) is likely worth keeping.
- Keep Forever:
- Red Shirt (respawn)
- Carbon Rod (ygg yield)
- Duck-t Tape (EM cap) - eventually you can reach EM cap hardcap with this as only EM cap item
- Compass (respawn)
- Keep Temporarily:
- Keep any item with R3 or Hack Speed stats until it no longer fits in a full Hack loadout
- Keep any item with NGU speed until it no longer fits in a NGU loadout
- Keep bar items for a while because cap times without them will get very long
- Bread Bowl Helmet + Vinyl Record Shard might be worth holding onto while you need them to reach EM cap hardcap
Adventure Zones
Adapted from Deceptive Thinker’s SAD strategy
T10
- Snipe BTS for gold, but skip farming BTS gear until T10 LRB
- LRB to T10 starting from WW snipe stats (2.65e27/830e24). Start with a Hackday
- Spend all EXP on Adventure Stats > Power during the LRB
- Focus PP/QP on Adventure Perks/Quirks
- Can extend the LRB to max WW and getting a single secret drop to throw into daycare
- After maxing BTS gear and obtaining Corgi, do a Snugday
- Video of Rust killing T10v1:
- Cooking: Wear the GRB set while eating meals. The set doesn’t need to be maxed/boosted
- T10v2 wall is 2-3 weeks optimally with guff RBs
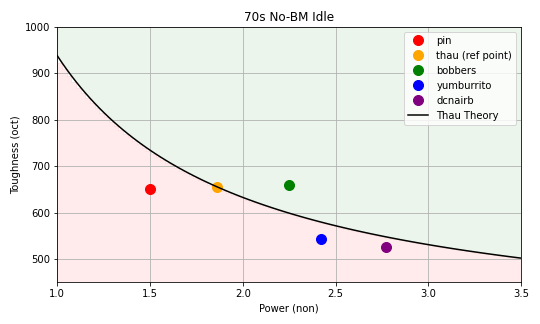
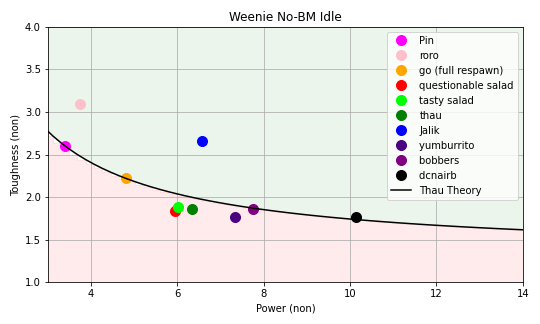
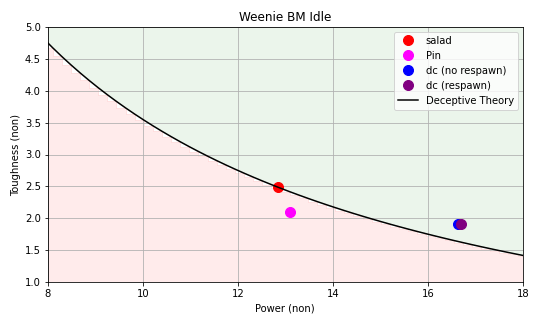
- Snipe Bread/70s mostly for gold, sets aren’t worth using until you can idle with BM
- Breadverse/70s Idle stats (courtesy of dcnairb):
| Breadverse Idle w/o BM | Breadverse Idle w/ BM |
|---|---|
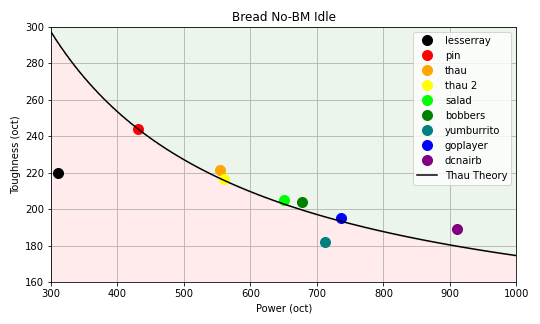 | 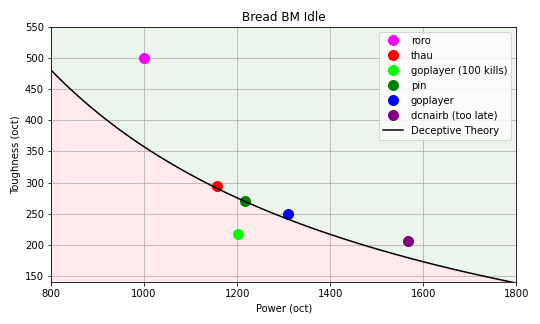 |
| 70s Zone Idle w/o BM | 70s Zone Idle w/ BM |
|---|---|
 | 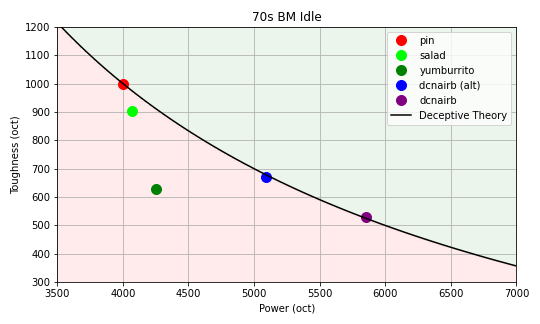 |
T11
- 2k adventure guff is a good point to start T11 LRB (~halfway between bread and 70s)
- Potions should let you BB sNGUs down to adv and exp with bread gear
- Snugdays are no longer a thing, get the sNGU → eNGU quirk and run sNGUs full time
- Your wishes will take a hit, but this is fine
- Don’t bother with Halloweenies until post-T11, extend LRB to max the set
- Set bonus is ridiculously good, worth taking a few days to knock out
- Halloweenies Idle stats (courtesy of dcnairb):
| Halloweenies Idle w/o BM | Halloweenies Idle w/ BM |
|---|---|
 |  |
- Max T11 set, then do a CBlock for any remaining challenges with rewards (blinds/trolls)
- T11v2 stats came around 3400 adv guff, around a full month after beating T11
T12
-
LRB took around a week each to T11v3 and T11v4, then 3 days to T12
- 11v4 accessories are amazing
-
Construction gear will be quickly outclassed by Duck / Nether, but useful for now
- Still not worth sniping, wait until idle
-
Duck / Nether are the real reasons for the T12 LRB, snipe as soon as possible
- Gear will be used through the end of the game
- T12 gear is trash, accessories are good. Weapon useful for sniping until Nether
- Extend LRB to max Nether after T12
-
Focus adv stats (Adv Tier, Perk 4-5, Quirk 4-5) and R3 for a final Hackday
-
Continue guff RBs until around 4.5k adv guff optimally, then start the final LRB to THE END
- Can start the final LRB sooner if desired, final LRB will just take longer
Tips for THE END
- If your QP gain is slow, consider wearing Quest Drops gear (Choffice Hat + Netherlands)
- Once you’re able to BB all blood rituals, blood gain is mostly just affected by blood guff %
- Run Wandoos XL in the final LRB for reaching Boss 300
- If you’re unable to reach 300, consider rebirthing for the Number gain
- Can also use pens on A/D chonkers to take advantage of the tier scaling
- At a certain point, Health Regen becomes more useful than Power/Toughness for T14 fight
- If you reach 150 Decillion / 150e33 Power, stop buying Power and switch to HP Regen