Gear Optimizer Guide
Gear Optimizer (GO) is a calculator for NGU Idle, which can be used to optimize use of various features, available as tabs on the top: Gear, Augmentations, NGUs, Hacks, and Wishes.
This mini-guide contains help for Gear / Augments / NGUs. Hacks is covered in the next mini-guide: Hackday Planning Guide. Wishes aren’t covered as most people don’t use it.
Gear
- The easiest way to get started is to tick ON the ‘Disable Unowned’ checkbox and then click ‘Import save from file’, then select your NGU save text file
- NGU save folder: C:\Users<UserName>\AppData\LocalLow\NGU Industries\NGU Idle
- Adjust the Highest Zone / Titan version / Looty / Pendant and Accessory Slots as needed
- Individual items can be enabled/disabled or have their level adjusted in the item display on the right side. Right-click on an item to open its menu.
- Items can only be edited for level, GO assumes max boost for a given level
- To start optimizing, set your Priorities in the top dropdowns to tell GO what to optimize for
- For each priority, you can set a maximum number of accessory slots to use
- Priorities will be calculated from top down. If a priority fills up all accessory slots, then any priorities below that priority will not be used
- Click ‘Optimize Gear’ and GO will create the best outfit for the priorities you gave
- You can modify outfits by clicking on pieces of your outfit to remove it or click on pieces of gear in your inventory to add it to the outfit. GO will display the differences in stats below.
- If you want to force GO to use a certain item, equip the item, right-click on it in your outfit, and click ‘Lock’ to force GO to keep the item while it optimizes.
Loadout Slots
- GO provides loadout slots, which can be used to save priorities/outfits that you will be using repeatedly and want to check often, or be able to keep updating them as you progress
- Loadout slots are immediately under the Outfit/Accessories on the left
- To save a loadout, after optimizing an outfit, you can type a name in the text field to the left of ‘Ignore Used’, and then click the Save button immediately above it
- This will save the loadout to a slot in the dropdown above the Save button
- You can go through your loadout slots by selecting an loadout name from the dropdown
- Click Save to assign your current outfit to the currently selected slot
- Click Load to display the saved outfit from the currently selected slot
- Click Delete to remove that saved outfit from your slots
- Click Show to open a display of the currently selected slot’s outfit below
- Click Load Priorities to empty the outfit, but assign the priorities you had selected for that slot to the current priorities at the top
- Click ‘Optimize All Saves’ to update all your saved loadout slots by re-optimizing their outfits for the priorities they had when they were saved
- Click ‘Unmark unused items’ to mark all items that are unused in any saved loadout slots with a red border on the item display on the right side
Gear Shortcuts
- Shift-click an item: Set the item level to 100 (or 0 if it was already 100)
- Ctrl-click / Alt-click an item: Toggle the item between enabled / disabled
- Click a zone name in item list: Collapse / Expand the item list of that zone
- Shift-click a zone name: Toggle the item list’s compact mode on / off
- Compact mode places all zone items in a single list, hiding all disabled items
- Ctrl-click / Alt-click a zone name: Toggles all items in that zone between enabled / disabled
Gear FAQ
-
What priorities should I use?
- Priorities can differ based on where you are in the game. If you’re in the first two chapters, you might just want to focus Power to grind through most of the early adventure zones. From Chapter 3 onwards, it’s suggested to have multiple loadouts that each focus on one priority while running a few Respawn items. Refer to your chapter, but some often used priorities include: Respawn, Time Machine, Advanced Training, Energy NGU, NGUs, Drop Chance, Gold Drops, Augmentations, and Move Cooldown / Power.
-
Why isn’t this priority working correctly?
- Check if it’s under another priority that’s using all available slots, or if the priority is set to be using a limited number of accessory slots.
-
What gear should I get rid of?
- If you use the loadout slots to save any loadout priorities that you will be using, you can use the ‘Mark unused items’ to determine which items are not being used by any of the loadouts / priorities you want. You can use this to determine what gear to trash.
-
What should I prioritize for challenges?
- There’s a few priorities that can be useful: Augmentations, Wandoos, Magic Cap Speed
-
What is E/M/R3 Cap Speed?
- Cap Speed means it optimizes for the fastest time that you can cap your resources in. This means low cap and high bars. Can be useful in challenges for activating your Magic Beards early
-
Why do I have a second weapon slot? How do I get rid of it?
- It’s possible to obtain a second weapon slot in mid-late Evil. If you clicked on the Titan 8 / 11 Preset, you probably turned it on accidentally. To get rid of it, progress your Highest Zone forward until you see a new property ‘Offhand Power’. Reduce this to 0%. Now you can turn your highest zone back down to your actual highest zone.
-
GO isn’t using Voodoo Doll / other item even though it’s better! Why not?
- Make sure your Titan version is updated for your furthest version defeated. This won’t automatically update even if you have items from further versions listed in GO
-
Trying to prioritize Wishes / NGUs + Wishes is crashing the site?!?
- No, those priorities just take a long time to calculate, wishes involve a lot more calculation than the other priorities. Let it sit for a few minutes and it’ll figure it out.
-
I’m starting to reach E/M hardcaps. How do I reflect this in GO?
- Turn on the Hardcap Input tick box on the right side. For all the Nude values, you’ll want to take off all your gear and accessories, then note down the Total for each.
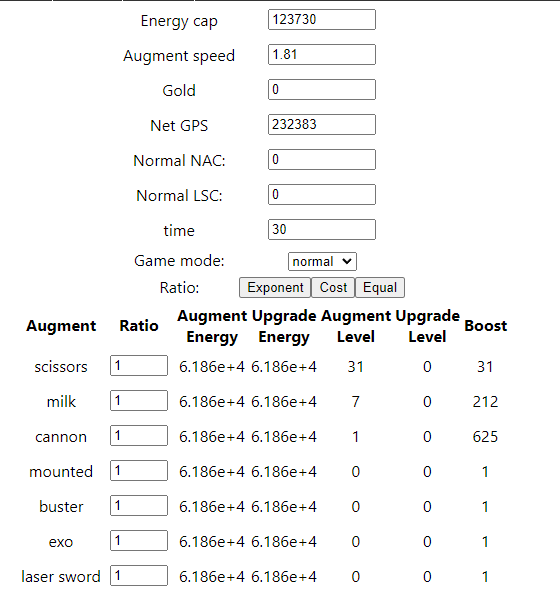
Augments
The Augments tab can be used to determine which augmentation is the most efficient to run
- Energy Cap: Enter in the amount of energy you’re going to allocate to augmentations
- If unsure, you can enter your Total Energy Cap
- Augment Speed: Enter in your Total Augment Speed, divided by 100
- Info n Stuff > Stat Breakdowns > Augments > Total Augment Speed Factor / 100
- Gold: This field can normally be ignored, but you can enter the amount of Gold you have
- Net GPS: Enter in the Net GPS from Time Machine
- If you haven’t unlocked / aren’t using diggers, you can just enter Gross GPS
- Normal NAC: Enter in the amount of No Augmentation Challenges completed
- If you haven’t done any No Aug challenges, this will be 0
- Normal LSC: Enter in the amount of Laser Sword Challenges completed
- If you haven’t done any Laser Sword challenges, this will be 0
- Time: Enter how long you will be running augments in your rebirth in minutes
- If you aren’t sure, you can just enter in how long your rebirth length should be
- Game Mode: Enter difficulty
- Ratio: Set to Equal
- Look at the final Boost column for each of the augments. Whichever augment has the highest Boost column value is the augment you should be focusing in your rebirths
In the example below, Cannon Implant is the best augment to run.
NGUs
The NGUs tab can be used to determine how much gain each NGU will give in a certain period of time, which is primarily used to figure out when you can run certain NGUs efficiently.
Note: Importing your save in the Gear tab will auto-fill in your E/M cap and NGU levels, letting you skip steps 1 and 5 below.
- Enter in your Energy/Magic cap (if you know exactly how much E/M you’ll be using for NGUs, use that number. Otherwise, just use your Total Energy/Magic caps)
- Enter in your Energy/Magic NGU Speed from Stat Breakdowns, divide by 100
- Found in Info n Stuff > Stat Breakdowns > NGU > Total E/M NGU Speed Factor / 100
- For NGU, put in 60 minutes. We’ll use an hour as a reference point to determine efficiency
- Turn off all the tick boxes
- If you’re in Evil/Sad and have bought either of the quirks, turn them on equivalently
- Enter in your current NGU levels in the ‘Normal Level’ column (if you’re in Evil/Sad, fill in all the columns with your respective NGU levels for each type)
- Look at the ‘Reachable Normal Level (Bonus Change)’ column, specifically at the bonus change in parenthesis for each NGU type
- If you have a bonus change greater than 1.05x in an hour for NGU Energy/Magic NGU, NGU PP, NGU Adventure B, or a bonus change lower than 0.95x for NGU Respawn, it may be very beneficial for you to run that NGU for an hour, focusing just on that NGU
- In a lower priority, NGU Gold / Time Machine can also be useful, but aren’t worth prioritizing as high as the above. Can be nice to run them when they are >1.10x gain
- If the above NGUs do not meet the bonus change thresholds, it’s probably better to split your Energy on Adventure / Drop Chance and your Magic on Yggdrasil / EXP
In the example image below, we can get 5% gains from running both NGU Magic NGU and NGU Energy NGU, so it would be a good idea to run NGUs for an hour putting all the Energy we would’ve spent on NGUs on NGU Magic NGU. Similarly, we should put our Magic we would’ve spent on NGUs on NGU Energy NGU. However, NGU PP, NGU Adventure B, and NGU Respawn do not provide enough gains to justify running them at this moment.
